Showing posts with label inspiration. Show all posts

Tuesday, 27 August 2013

AW13- The Trends

Fashion Week is fast approaching and fashionistas around the world are preparing for yet another intake of what trends we'll be inspired by and wearing in Spring/Summer 2014. Like many, I anticipate what direction designers and brands are going to take next and lust over the designs that grace the catwalk and beyond. 

The fashion world witnessed Autumn/Winter 2013 collection shows back in February and I'm looking forward to reviewing some of my favourite looks from Spring/Summer 2014 shows in an upcoming post. With the introduction and development of high street brands now hitting the catwalk such as Topshop Unique, H&M and a collaboration between Rihanna and River Island, many of us can now shop the trends at a reasonable price. Whilst we hold onto the last of this year's Summer fashion, I've put together some of my favourite pieces that are shaping key looks for the months ahead.

Topshop: Tartan Tee- £30, Trousers- £42, Skull Scarf- £22, Miss Selfridge: Printed Tee-£32, Printed Playsuit- £39, ASOS: Shredded Jumper- £28
 
Miss Selfridge: Floral Print Dress- £45, Printed Organza Dress- £25, Topshop: Ruffle Top- £34, Zip Satchel Bag- £32, Zara: Floral Blouse- £25.99
Topshop: Cobweb Snood- £16, Mini Block Heel T-Bar Shoes- £35, Fashion Union: Rabbit Knit Jumper- £18, Primark: Pastel Coat- £25, Zara: Trousers- £29.99

Forever 21: Floral Jumper- £19.75, Boohoo: Leather Buckle Wedge- £25, Dorothy Perkins: Floral Necklace- £12.50, River Island: Check Tee- £28, Sandals- £55, Accessorize: Bag- £13.50, Fashion Union: Jumper- £15


Monday, 19 August 2013

Home Is Where The Heart Is

Sorry for the lack of posts recently! I have been très busy with my summer and preparing for my 3rd year of uni, which seems crazy to think is happening already. University life got me thinking about one of my major loves- home interior. Going to university is a really exciting prospect but leaving the comforts of your own home can be in essence a daunting prospect for many at the start of the academic year.

Although the revelry of next month's freshers week is the number 1 top priority for many of us students, the welcome of a somewhat homely room is sure to make everyone feel at ease in an unknown environment. Many home stores offer a range of home decorative accessories that can add a quirky touch to any room. With many, if not all students on a budget, the smallest of objects can often make the biggest impact. I commute to uni only living around 20 minutes away but my bedroom at home reflects my interests and gives me admirable space to work and store all my little bits and pieces away. I'm planning to  hopefully move out for my final year with some friends and I know that I don't need to take my whole existing bedroom to make a new place seem homely.

I've put together some of my favourite items below and some tips on how to make halls feel like home.


1. Old touches- You probably have tons of existing bedding, lamps and decorative items stored at home in the loft, your parents won't need them and these can be given a burst of new life in your new room. Storage boxes are a great way of keeping clutter away and can easily be tucked away too.

2. Photos and posters- Taking pictures of friends and family with you and placing them in frames or on pinboards is a great way to make you remember old memories and home. Although it might be a bit overwhelming at first, the photos of university life will make you in years to come remember the new memories you had.

3. Lighting- Lights can massively change the shape of a room and you'll need to have good light when studying. Fairy lights always add cosiness to a room and you can pick these up almost anywhere. 

4. New touches- The feeling of independence grows with the thought of buying new things for your uni room and the thought of adding your own touch to a new environment is a fun thing to do before starting your course. Making your room comfortable and suited to your interests for when friends, family or flatmates decide to drop in for a quick visit will make them feel comfortable too. You could even get crafty on a rainy day or before you start and make some DIY interior accessories!

5. Keep it clean (!)- The thought of tidying your room at uni is probably the last thing on your mind and it probably brings back reminders from home, but keeping your room tidy makes a tidy mind and you need some space to work and find things quickly if you wake up late for lectures from an evening at freshers!


Mirror- £39.99, Bird Cushion- £9.99, Cupcake Cushion- £12.99, Lantern- 49p!, Trunk Box- £7.99, Birds Cage- £1.74, Owl Jewellery Stand- £3.49, Heart Tealight Holder (I recommend!)- £3.99, LOVE Blocks- £2.99, Flower Vase- £1.49, Roses Bunch- £6.99, Home Canvas- £9.99


Lace Borders- £4, Milk Bottles- £12, Honeycomb Balls- £6, Roberts Radio (for a real moving in treat)- £159.95, Liberty Notebooks- £9-£10, Marshmellows (to share with your flatmates!)- £4, Crafty Storage collection- £8-£35, Candle- £8.50, Cath Kidston Fabric Bundle- £25

URBAN OUTFITTERS
KIKI'S BOUTIQUE
HOBBYCRAFT
THE RANGE
NEXT
DOTCOMGIFTSHOP
H&M
HOMEBASE
EBAY

There are a whole host of other stockists that sell a range of home interior accessories and a quick tip is to always check out websites that list 'Gifts' in their menus- this always pulls out some fun and quirky items to fill your room! So whether you're moving from the family home to halls or from halls to a new home with your uni friends, I hope I've inspired you that home is where the heart is!
xo


Saturday, 3 August 2013

Illustration Inspiration

I'm currently in the process of writing up a plethora of posts but thought I would quickly share some of my current inspirations from the world of illustration.

Illustration falls under the words of Individual, Inspiring and Innovative. No I haven't gone alliteration crazy (!), but these are all things I always research and incorporate when I'm designing and gaining inspiration from others. The illustrators below are all designers I've been hugely inspired by over the last couple of years and it's been exciting for me to learn from their work, yet at the same time watch how they have been able to develop their individual styles to a wider audience through the means of various media.

Once again I've been on trusty Photoshop and have collated some of my favourite designs from each illustrator below. When putting the images together it was so nice to see how quickly you can identify their style and interests. Enjoy!


A German native, Sabine Pieper's illustrations are marked by strong expression, unique compositions and colour. Through the strength of her past photography career, she has been able to use this to her advantage by using soft photographic techniques within her drawings. The creation of subtle, yet energetic lines is synonymous within her portrayal of femininity and beauty. Sabine has seen her predominant fashion and beauty illustrations featured in various publications such as Vlisco and Elle UK. 


Inspired by the freedom and confidence of illustrators such as Julie Verhoeven and providing much comparison to Sabine Pieper's work, Sarah Hankinson's designs are defined by feminine subjects and bursts of watercolour. Sarah has been one of my favourite illustrators for a while now, her designs are so simple yet in a sense quite flirty and energetic with the colourings and lines she develops. She has also seen her work published for Harpers Bazaar and Maybelline, amongst others.


Out of the illustrators featured in this post, Kelly Smith aka Birdy & Me is probably the one who has achieved the most commercial experience, exposure and success within fashion illustration. Working with Vogue, H&M and net-a-porter just to name a few has already provided her with the room to develop even higher. Kelly's definitive pencil lines and toning make her work unique in capturing every detail of her subject.


I've been following Stina Persson's work for around 3 years now and she is always one illustrator I look to when creating mixed media pieces. Her exploration of cut paper, watercolour, ink and photographic manipulation shows a utilisation of incorporating any medium into a drawing. I've always been worried when using the watercolour "dripping" technique that it will ruin what I've already done but Stina has taught me that you can do this technique and still make a piece work effectively. 


Friday, 19 July 2013

Do It Yourself!

Being a fashion and textiles student plus a HUGE follower of DIY fashion, it's so nice to see dressmaking providing an innovative platform for anybody, of any level. There is so much inspiration around as of late, from a range of accessible sources and you don't even need to leave the house to get creative. Make do and mend is an attitude that I definitely consider and encourage within my own wardrobe. 

Having the satisfaction of saying that you were able to fix or create something yourself is such a feeling and even if you aren't skilled in the technical side of dressmaking, there are so many tutorials out there on YouTube and other fashion blogs that can help you begin and ultimately develop. The throwaway culture within the fashion industry mainly accounts for the disposal of old and unworn clothing, which are replaced with more innovative styles. Though instead of throwing away all unworn clothing, we can take designer/high street inspiration by customising and creating new pieces from such clothing, yet something that can also be turned into an item that becomes totally original. 

Scouring social media for research is something I'm always inputting into my degree work and I've been inspired by the creativity and uniqueness of those who take part in DIY fashion. The one thing I really admire is how different and creative every person is. There is obvious inspiration from current industry trends and that's why I love picking up on this and turning already owned items into innovative pieces. I was going to share some of my favourite DIY focused blogs but there are just too many to choose from! However, P.S.- I made this... is probably my favourite. Some of the projects are so simple yet effective and on trend, with the added bonus of video tutorials providing an extra walkthrough whilst you carry out the project. Pinterest is also a great source of inspiration which brings up a multitude of DIY results from fashion, textiles/craft and homeware.

Below are some ideas from P.S.- I made this... and other inspiration from across the Internet. 

+ 
I'm hoping to try out a DIY sunglasses project as I'm currently living in a beautiful heatwave so I'll post a tutorial sometime soon! xo


The two tone trend is everywhere; from fingers, to frocks to locks…but why stop there? When it comes to fun in the sun, two is always better than one…so grab a friend and that bin of bright nail polishes (we know you have one) to add some shade to your shades! Watch this DIY go down on our new series on StyleList.com, "Pretty Savvy" presented by Jeep! Get inspired all Summer long as Erica presents a collection of j’amazing new projects; from fresh fashions to artsy accessories and more.  


To create: Use paper tape to separate the top half from the bottom of the sunglasses. Using your first nail polish color, paint on an even layer onto the top half of the sunglasses. If the lacquer appears opaque, paint an additional layer. Remove the tape and paint the bottom half with an alternate nail polish color. For a glossy finish, apply a top coat.

 
This summer enter the “Pretty Savvy" Sweepstakes for the chance to win a weekly prize of $500 and a Grand Prize of $1,000! Click here to find out all the details!

 
Get down with DIY and a dope playlist
CLICK HERE for the P.S.- I made this…Playlist
Curated by The Jane Doze


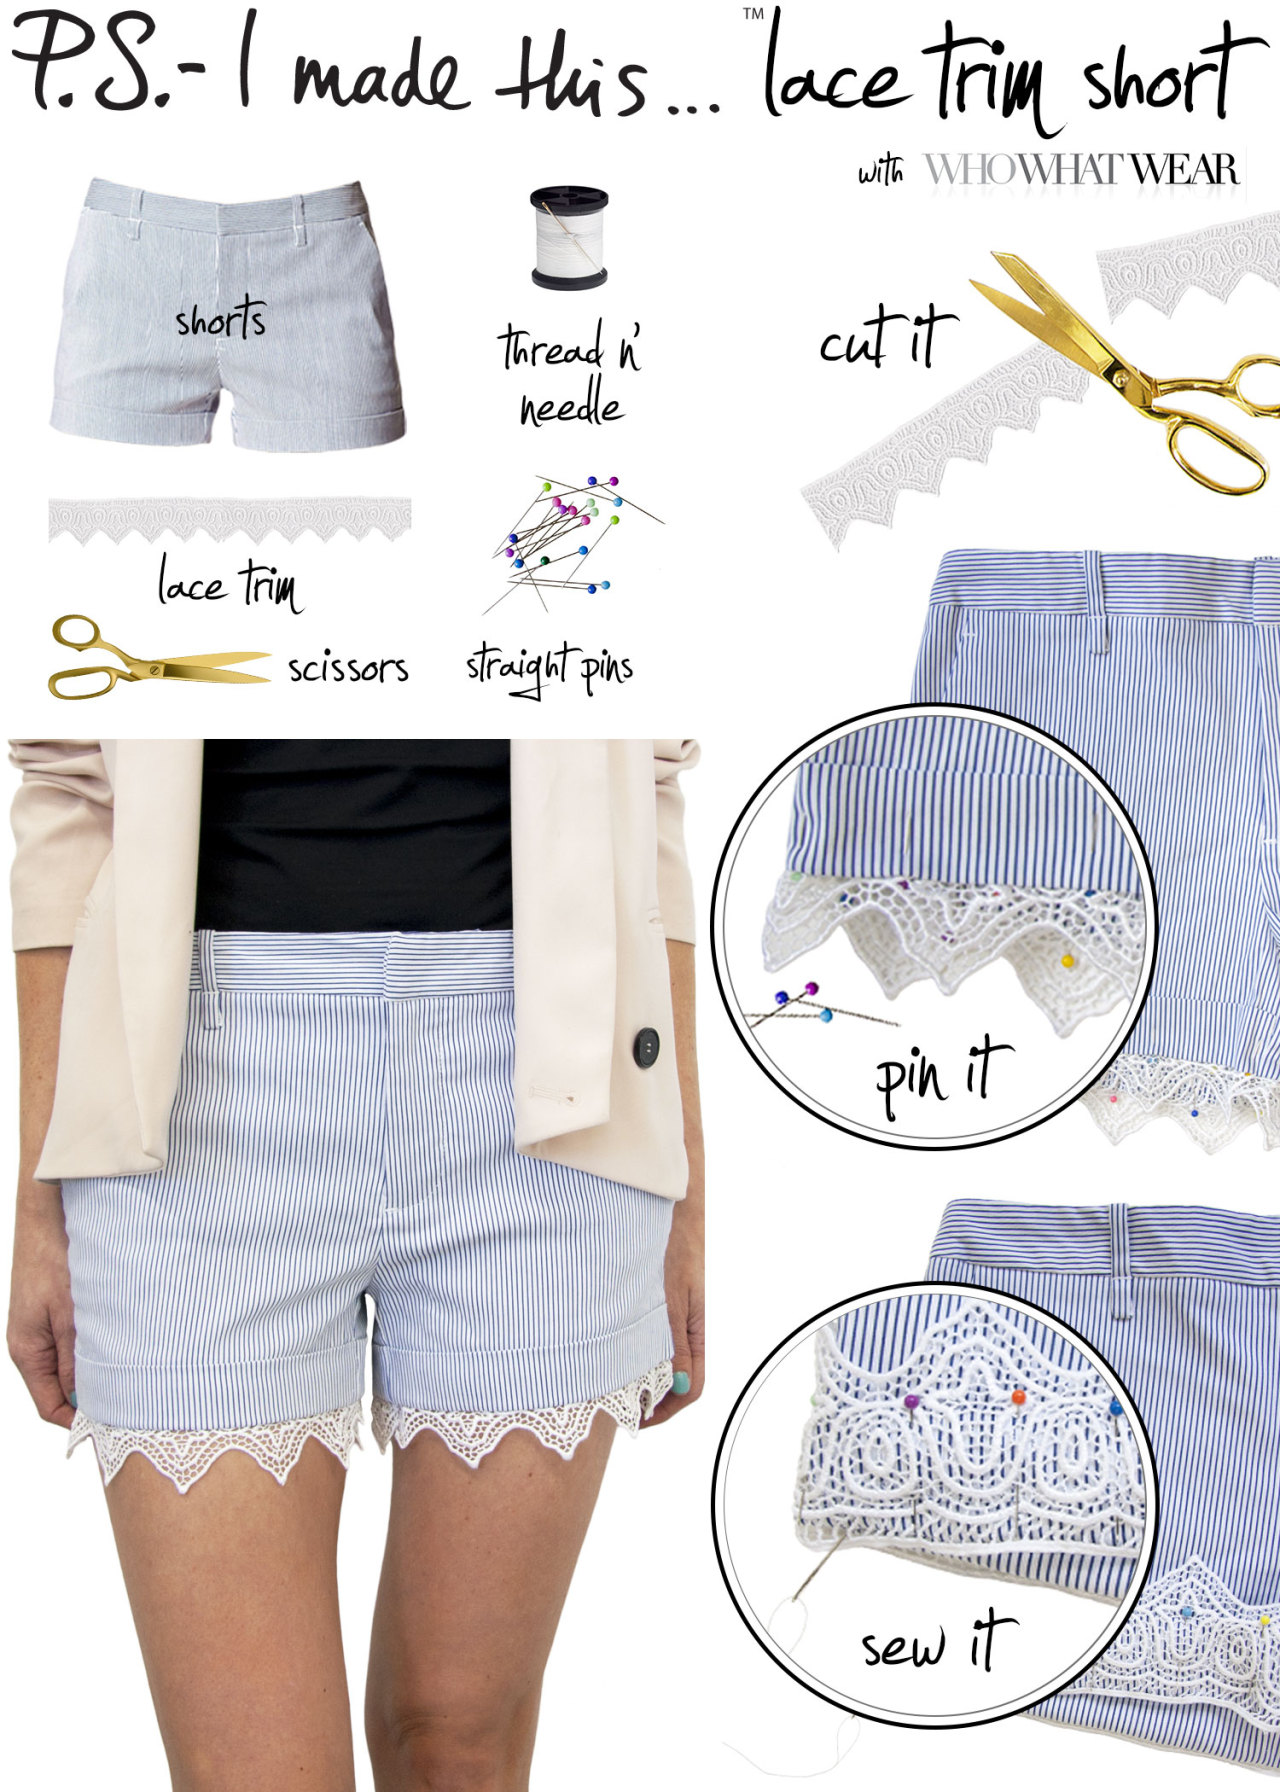
To all the ladies in the place with style & grace…what’s better for turning a smart pair of shorts into a summertime staple than a little bit of lace? Let’s face it, you can’t wear your favorite jean cut-offs every day…so take a cue from Rag & Bone, who prove that a touch of this delicate fabric can add ladylike charm while maintaining a smart & stylish feel. Join us along with Who What Wear as we start the season off right with this sweet & sassy finish! 


To create: Cut two pieces of lace trim long enough to wrap around each leg opening with fabric scissors. Fasten trim to the inside of the shorts with straight pins. Lastly, sew the trim to the inside of the shorts to secure using a needle and thread. 

 
Get down with DIY and a dope playlist
CLICK HERE for the P.S.- I made this..Playlist
Curated by The Jane Doze


Dots, dots, lots of dots!  The power of the polka dot is proving to be one of the strongest trends for Fall/Winter.  While some may dance the polka, you may want to wear it on your sleeve. Marc Jacobs FW11 Collection fused the classic black & white combo with darling dots from head to toe, which is our DIY inspiration.  Only Marc could dream up this over-the-top pop of polka, reinventing a classic look with a modern twist. 
It’s on: Reach for fusible fabric which is available at most fabric stores.  You can also purchase online.  BONUS—Its’s very inexpensive!  Trace your polka dot pattern on paper.  I suggest using a bottom of a cup or any other circle you may have.  Cut out the pattern and place on top of fusible fabric.  To speed up the dot cutting, fold the material back and forth, which will result in multiple dots cut.  After you have cut out a bunch ‘o dots, place them a straight line on a white cotton tee shirt.  P.S.- Use a ruler or straight edge to help keep them in line.  Make sure you place them adhesive side down.  Feel free to have the dots go off the tee shirts edges, you can trim at the end.  Row by row, iron as you go- making sure the dots are totally fused on.  Once all the dots are adhered to the tee, use scissors to trim the hanging material. 
You may want to wash, for the first go ahead, and hang to dry. Keep some extra dots on hand incase you have any fallen soldiers aka, polka dots. Dance the polka… don the dots!


Mayday…Mayday…Summer is approaching in a big, big way and your wardrobe is in need of a fresh coat of paint - literally! The days ahead are easy breezy, so step into the season with a fresh and colorful outlook. Block out some time for this DIY that mixes simple-chic style with bold n’ bright hues.


To create: Use gaff tape to section off the cuffs, collar, pocket and button line of your button down shirt. Pour a small amount of fabric spray into a paint dish, then use a foam brush to apply a thin layer to the cuffs of your shirt. Choose two other colors, then repeat the process on the rest of the blocked off sections. Once dry, remove the tape and join the color-block trend! 

 
Get down with DIY and a dope playlist
CLICK HERE for the P.S.- I made this..Playlist
Curated by The Jane Doze


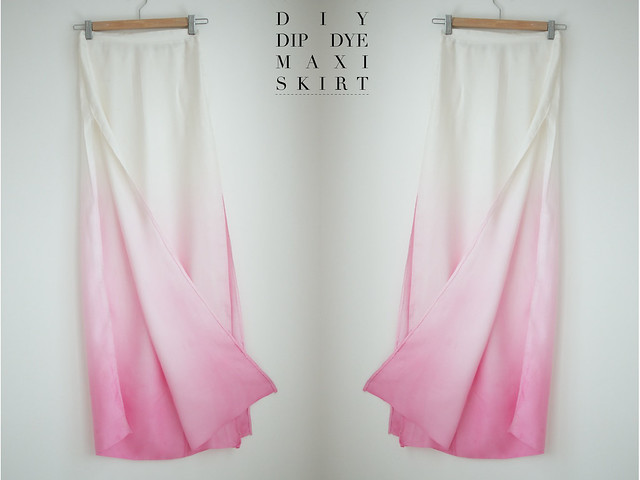
A PAIR AND A SPARE DIY DIP DYE SKIRT